In My APPinion: Multi-Syllabic Word Party & GIVEAWAY!

Wednesday, September 30, 2015
Appy Wednesday! Raise your hand if you love a party! Me too! Recently, Luke from Home Speech Home contacted me about his new app, Multi-Syllabic Word Party! My Multisyllabic Circus activity in TpT is a big seller, so I know I am not the only one working with students on multisyllabic words. This is an easy to navigate app that will help your students understand multisyllabic words as well as give them some extra exposure and practice to these words.
I was provided with a copy of this app, however, all opinions expressed in this review are my own.
When you first open the app, you will see the screen pictured above. There are 4 activities to choose from: Tap Tap, Outline, Remember, and Say & Slice. If you choose Tap Tap, you will be prompted with pictures similar to the one below. Students are to tap each circle below the picture (one for each syllable in the word) then say they entire word. 
If you choose the Outline activity, you will see a screen like the one below. Your student is to tap and drag the pictures from the bottom of the screen into the it's matching outline (kind of like a puzzle)
After you drag the correct piece into the outline, you are prompted to tap and say the syllables in the word. 
If you choose Remember, you get to play a memory game with multisyllabic words.
Last but not least, Say & Slice! With this activity, student have to slice the letters that are different colors (for different syllables) and say it. After the letters fall off, drag them up and lock them back in.
This is a fun app that is easy enough to navigate without much direction, although directions are given before each activity is started. The app is very colorful and has engaging pictures for the kids. I really like that you have the option to choose how many syllables you want to target so it can be appropriate for each student you use it with. There isn't an option for data collection, but I don't think it's necessary for this app. The idea is more of a fun, playful way to work with multisyllabic words. This is a great app to use with students learning about multisyllabic words, articulation students, as well as students working on the phonological process of syllable deletion. 
You can learn more about this app and download a copy in the iTunes store here!
**Make sure you follow me on Instagram @simply_speech for a chance to win a copy of this app!**

Learning on the Go! Glow Draw

Monday, September 28, 2015
Grocery shopping, soccer practice, dance class, play dates, target runs… seems like we spend half of our days in the car. When you're on the go so much, how do you have time to sit down with your child and work on academic and language skills? Truth is, being in the car can provide some incredible opportunities! First and foremost, it can provide some quiet quality time, away from the TV, with your little one. Talk to them. Ask them questions. Look for the letter "M" on street signs. Play "I Spy" with colors. There are so many opportunities out there when we take the time to forget how rushed we are to get our to-do lists completed and just talk to our sweeties.
A few days ago, Kevin, Kenzie, and I were on the way to look at tile for our new bathroom. (Did I tell you we are re-doing our master bathroom? Long story short, we thought we had a mold problem… we don't. But after a complete demolition job to find the source, we now get a new bathroom :) While on the way to the store, Kenzie and I started playing a game with an app I had on my phone called, Glow Draw. This is a simple app that lets you draw with your finger, but there is so much you can do with this. I was drawing shapes, letters, and numbers on the phone and Kenzie was telling me what they were. Simple, right? Incredible simple, but Kenzie loved it. And now she asks to do this every time we are in the car. My favorite part was when she took the phone and started quizzing me. Every letter looked like a number 1, but I loved that she was trying.
Of course, if you are the one driving, this isn's a safe game, so please don't try it. But it's perfect for road trips with the family or you could have an older sibling to use it. I know growing up, I always loved being the teacher for my little sister. Learning opportunities are everywhere, take advantage. Your kids will appreciate the time and attention you give them during your busy day.

Pin of the Week: How to Make a Burlap Wreath!

Friday, September 25, 2015
Last month, I helped film a news segment at my favorite place, Aerie Lane! If you aren't local to me, Aerie Lane is an adorable craft bar where you can take classes to learn how to make those adorable crafts you have been eyeing on Pinterest and Etsy. And yes, you can even have a a glass of wine with your best friends while you do this. The news segment featured that oh so popular burlap wreath you see on so many festive doors these days. After I created mine, I shared a picture of it on Instagram. I had so many of you request a tutorial, so here it is!
 You all weren't the only ones requesting a wreath tutorial. My friends and I often host Pinterest Parties (this is the perfect way for me to still see my friends and hang out with two babies at home!) A Pinterest Party consists of each of us bringing a yummy dish we have been eyeing, drinking some wine, and making a craft together. After my friends saw the picture of the wreath, they decided that would be our next craft. So all of these pictures are from me teaching them how to make one. It's actually very easy once you get started. I hope I can explain well enough on here, if not, check out YouTube for some video tutorials. Here we go!

What you need:
- 1 metal wreath frame (any size you want, I used 16")
- 2-3 rolls of 5" burlap ribbon  (It just depends on how full you want your wreath)
- 1 pipe cleaner cut in half
- Ribbon, a wood letter, flowers or anything you want to personalize your wreath
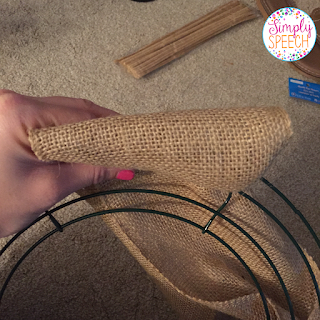
First step, turn the wreath frame over and tightly loop the burlap around the middle wire. Some people prefer to tie it in a knot, I like to use a pipe cleaner to secure the burlap to the frame. This won't be seen so it doesn't have to be pretty. Then, pull a few inches of the burlap ribbon through the top row of the frame. Keep it loose like in the picture above. Hold it with your thumb and index finger while you loop the burlap through the second row of the frame. It should now look like the picture below. 
Do the same thing for the bottom row of the frame. At this point, your wreath should look like the picture below. 
After you have your 3 rows of burlap loops, slide it all the way over to the right so the burlap scrunches and looks fluffy! 
See how the frame is divided into sections? You will complete these steps twice in each section. Then, do just a single loop through the middle before moving on to the next section of the wreath. Does that make sense? So you will have a row of 3 loops, a second row of 3 loops, a row of 1 loop in each section of the wreath frame. 
If my directions were clear enough, your wreath should start to look like the one pictured above. You want to try to make sure the back isn't super fluffy- it will make the wreath harder to hang. 
Once you are finished, secure the end of the burlap to the frame with another pipe cleaner. Then, decorate your wreath! I had some help with my bow, but here is a tutorial I found on Pinterest. 
Check out my adorable friends and their fun wreaths! I am super excited because 3 of these ladies are expecting little girls in the next few months so I see lots more Pinterest Parties in our future (probably with more tutus and bows!) 
Below is the video of the WFLA news segment we filmed for Gayle's Guide to Pinterest on burlap wreaths. 
Happy crafting!

How I Use Articulation Activity Notebooks!

Thursday, September 24, 2015
We all know that articulation therapy can get a little dull. There are only so many times you can practice your sound before you play Pop the Pig. I am always on Pinterest searching for fun, new ways to make articulation therapy more fun. Interactive notebooks have been super popular lately.  I am in love with the idea of each student having their own notebook for so many reasons. Kids loving having their own notebook. They take ownership and pride in their notebook, so they really do their best work (most of the time!) It also is like a running record of the students' progress. You can see as the notebook goes on through the year how they have moved from simply practicing sounds, to words, and now phrases. It's great for sharing with parents and teachers. It also helps when it comes time to write up new goals, IEPs, or plans of care.
So, needless to say, I joined the fun and created some interactive activity notebooks for my students. Here is how I use them:  I usually pull the notebook out once a week. Before the session starts, I will print off an activity from the packet and have it ready for the kids. The nice thing about all of these notebooks, is that each and every sound packet has the same activities in them. So, if you are working with a group of students that are each working on different sounds, they can all complete the candy jar activity, just with their own target sounds on their page!
Some examples of activities included are: Rainbow Writing, Tic-Tac-Toe, Word Searches, Color by Word, word sorting, Arctic 4-Square, and lots of cut, color, and glue activities. My students have really enjoyed using these notebooks. It's a great change of pace from skill and drill therapy, but still targets their speech goals!
It's a work in progress, I don't have all the sounds finished yet… but they are coming! Those of you that have already purchased some of the notebook activities from my store, thank you! I see your requests for more sounds and I promise, as soon as the baby gives me a good nap, I'll crank a few more out! Please leave a comment letting me know what sounds you would like to see a notebook for! Check out the notebooks that are already in the store here!

Nutrition Thematic Unit!

Wednesday, September 23, 2015
As much as I loved being on maternity leave and home all day long with my babies, it feels good to be back working a bit. SInce school is back in session, I have been trying to include as much school curriculum (letter of the week, sight words, spelling words, themes, etc) into my speech sessions. A few weeks ago one of my preschool students was working on a nutrition theme so of course I had to make a speech and language unit to go with it!
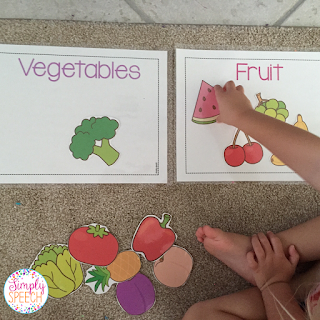
The student I made this unit for is working on pronouns, negatives, expanding utterances, and vocabulary. So all of the activities included in this packet target those goals, plus many more. The picture below is of the Healthy Henry activity. This includes large pictures of food from each food group, a large happy face (Henry), and a large garbage can. I attached them with velcro to formula cans but paper bags or even just laying the face/grabage can on the table would work too. The idea of this activity is to sort the foods into healthy, happy foods and garbage "junk" food categories.
Pronouns seem to be a common goal lately. I included an activity that includes one boy picture, one girl picture, and two kids together. This activity targets the pronouns he/him, she/her, and they/them. Give your students directions that include pronouns, such as: "Give the apple to him." to target receptive pronouns. You can also flip it to an expressive activity and have the child tell you, "She wants cheese." or "They are eating yogurt and nuts." It's purposely left pretty open ended so you can use it as you need.
For this particular student, we aren't to the pronouns yet, we are still working on boys vs. girls. When the sorting motivation was low, I brought in some royal back up! We used the large pictures from the Healthy Henry activity and gave them to her prince and princess dolls. Worked like a charm :)
Also included in this packet is food group posters, a food group sorting activity, short stories with comprehension questions similar to my Say What activities), and a healthy plate craftivity. I had a lot of fun with this unit and I think my student did too. The teachers I work with were thrilled to have this unit to add to their lesson plans! You can download a copy of this activity in my TpT store here!

Simply Speech Has a New Look {Giveaway!}

Tuesday, September 22, 2015
I am so excited about the blog's new makeover!  I have Kassie from Designs by Kassie to thank for this new bright and cheerful look. I have decided to take the blog into a slightly different direction. Ever since leaving the school system 3 years ago, I have been searching for my niche. I continued to blog about things I did in therapy, app reviews, etc, but I felt like it wasn't personal enough. Ever since going on maternity leave in June, my life has been 100% about my family. Being home, I have been able to do fun things with Kenzie where I have been able to pack language opportunities in. Everything from going grocery shopping, trips to the library, art projects, and cooking! That's when it hit me- I want to focus my blog on fun and easy family oriented activities that parents can do with their kids to enrich their language. I am still working part time as an SLP so there will be plenty of therapy related posts and products to share, but I love that I also get to share with you all the family side of my life. That is what inspired the new tag line: "Speech Life. Family Life. My Life."
 In celebration of my new blog look and focus, I want to giveaway some goodies!! I have teamed up with The Peachie Speechie and now have some Simply Speech swag! You can check out the new line of goodies here! Enter below for a chance to win some Simply Speech goodies! Contest ends Friday at midnight.

My 10 Favorite Books for Pirate Week!

Wednesday, September 16, 2015
In honor of Talk Like a Pirate day on September 19th, this week has been deemed, Pirate Week! Actually, I like to stretch pirate week out to 2-3 weeks because there are just so many fun pirate activities, but this is the week you will see pirates invading classrooms, blogposts, and therapy sessions.  I wanted to share a few of my favorite pirate themed books that I use in therapy while celebrating those silly scalawags! Below I compiled a list of my 10 favorite books to use during Pirate Week!
This post contains Amazon Affiliate links for your convenience. 


8. Pirate Nap: A Book of Colors by Danna Smith
9. Pirate Boy by Eve Bunting
and of course we can't leave out,
10. The Pirate Who Couldn't Say Arrr! by Angie Neal

I would LOVE to hear what your favorite books are! Please leave a comment sharing your top pirate books :)


Powered by Blogger.